Big Data Notes
Exploring big data technologies with Raspberry Pi.
Hadoop
Theory
Overview
Big data is data which can’t be efficiently stored and processed using traditional methods.
The three v’s are commonly used to explain what makes this data so hard to deal with:
- Volume: There’s a lot of it.
- Variety: It comes in a range of forms - audio, sql, video, csv, email, pdf etc.
- Velocity: It’s coming in at increasingly high rates.
So what is Hadoop?
Hadoop is a collection of open source software that makes it easier to store and process big data.
The main components of the Hadoop framework are:
- Hadoop Distributed File System (HDFS)
- MapReduce
- Yarn
HDFS
There’s a few reasons why storing data on a single machine can be problematic:
- There is sometimes too much data to store on one machine.
- Processing data stored on a single machine is time consuming.
- Buying bigger machines (vertical scaling) is more expensive than buying more machines (horizontal scaling).
HDFS is a file system where the files are split into blocks and spread over a cluster of computers (nodes).
There are two key types of nodes in the Hadoop cluster that facilitate this file distribution:
- NameNode: The NameNode is the master node in the cluster. It holds the file system information - what blocks make up what file. The NameNode itself doesn’t store the blocks.
- DataNode: The DataNode is the slave in the cluster. It’s function is simple - it stores blocks of data. It doesn’t know what files these blocks belong to.
If a DataNode in the cluster goes down, is the data it stores still available? Yes! Hadoop is fault tolerant. It achieves this by backing each file up on different DataNodes. The number of copies made is configurable and referred to as the replication factor.
The NameNode will know if a DataNode goes down as the DataNode sends the NameNode a periodic heartbeat, which it will obviously not receive in the event of a crash.
Let’s pause and go through the process of reading/writing data to HDFS.
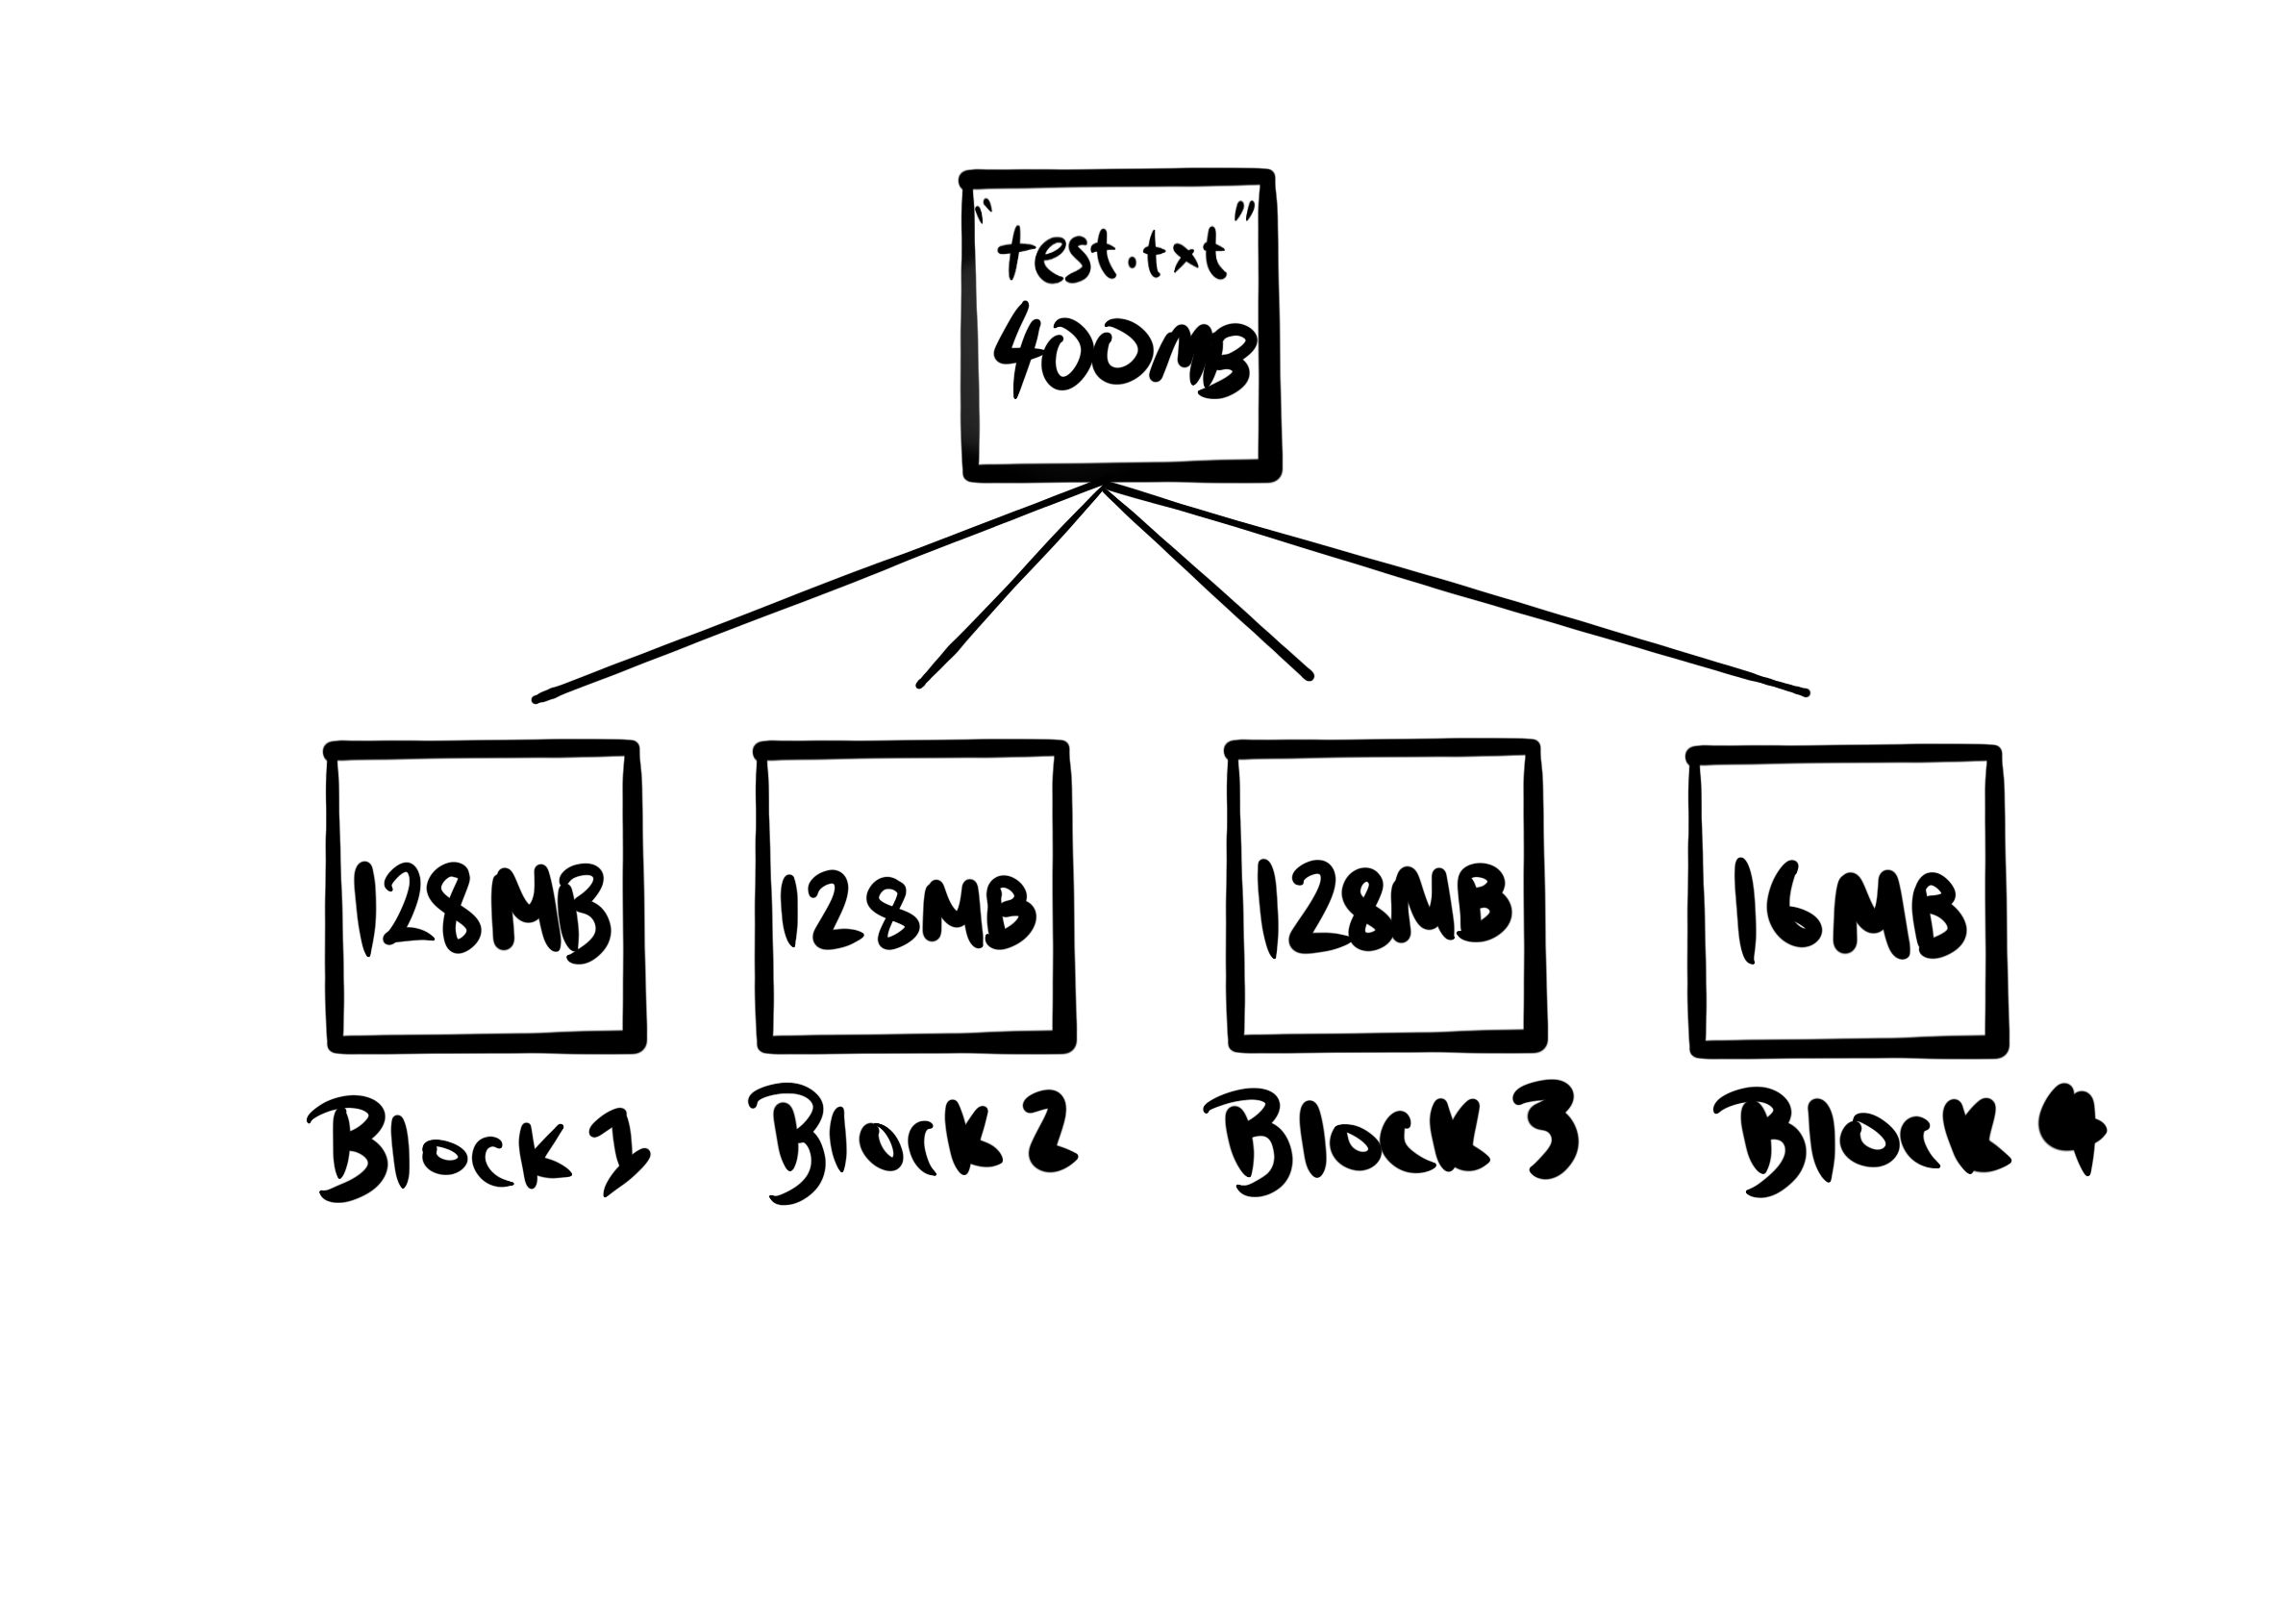
The first thing that happens when a Hadoop client wants to write a file to HDFS is it splits the file into blocks. For example, with a 128MB block size a 400MB file will be broken up as follows:
The following process will then be followed for each block:
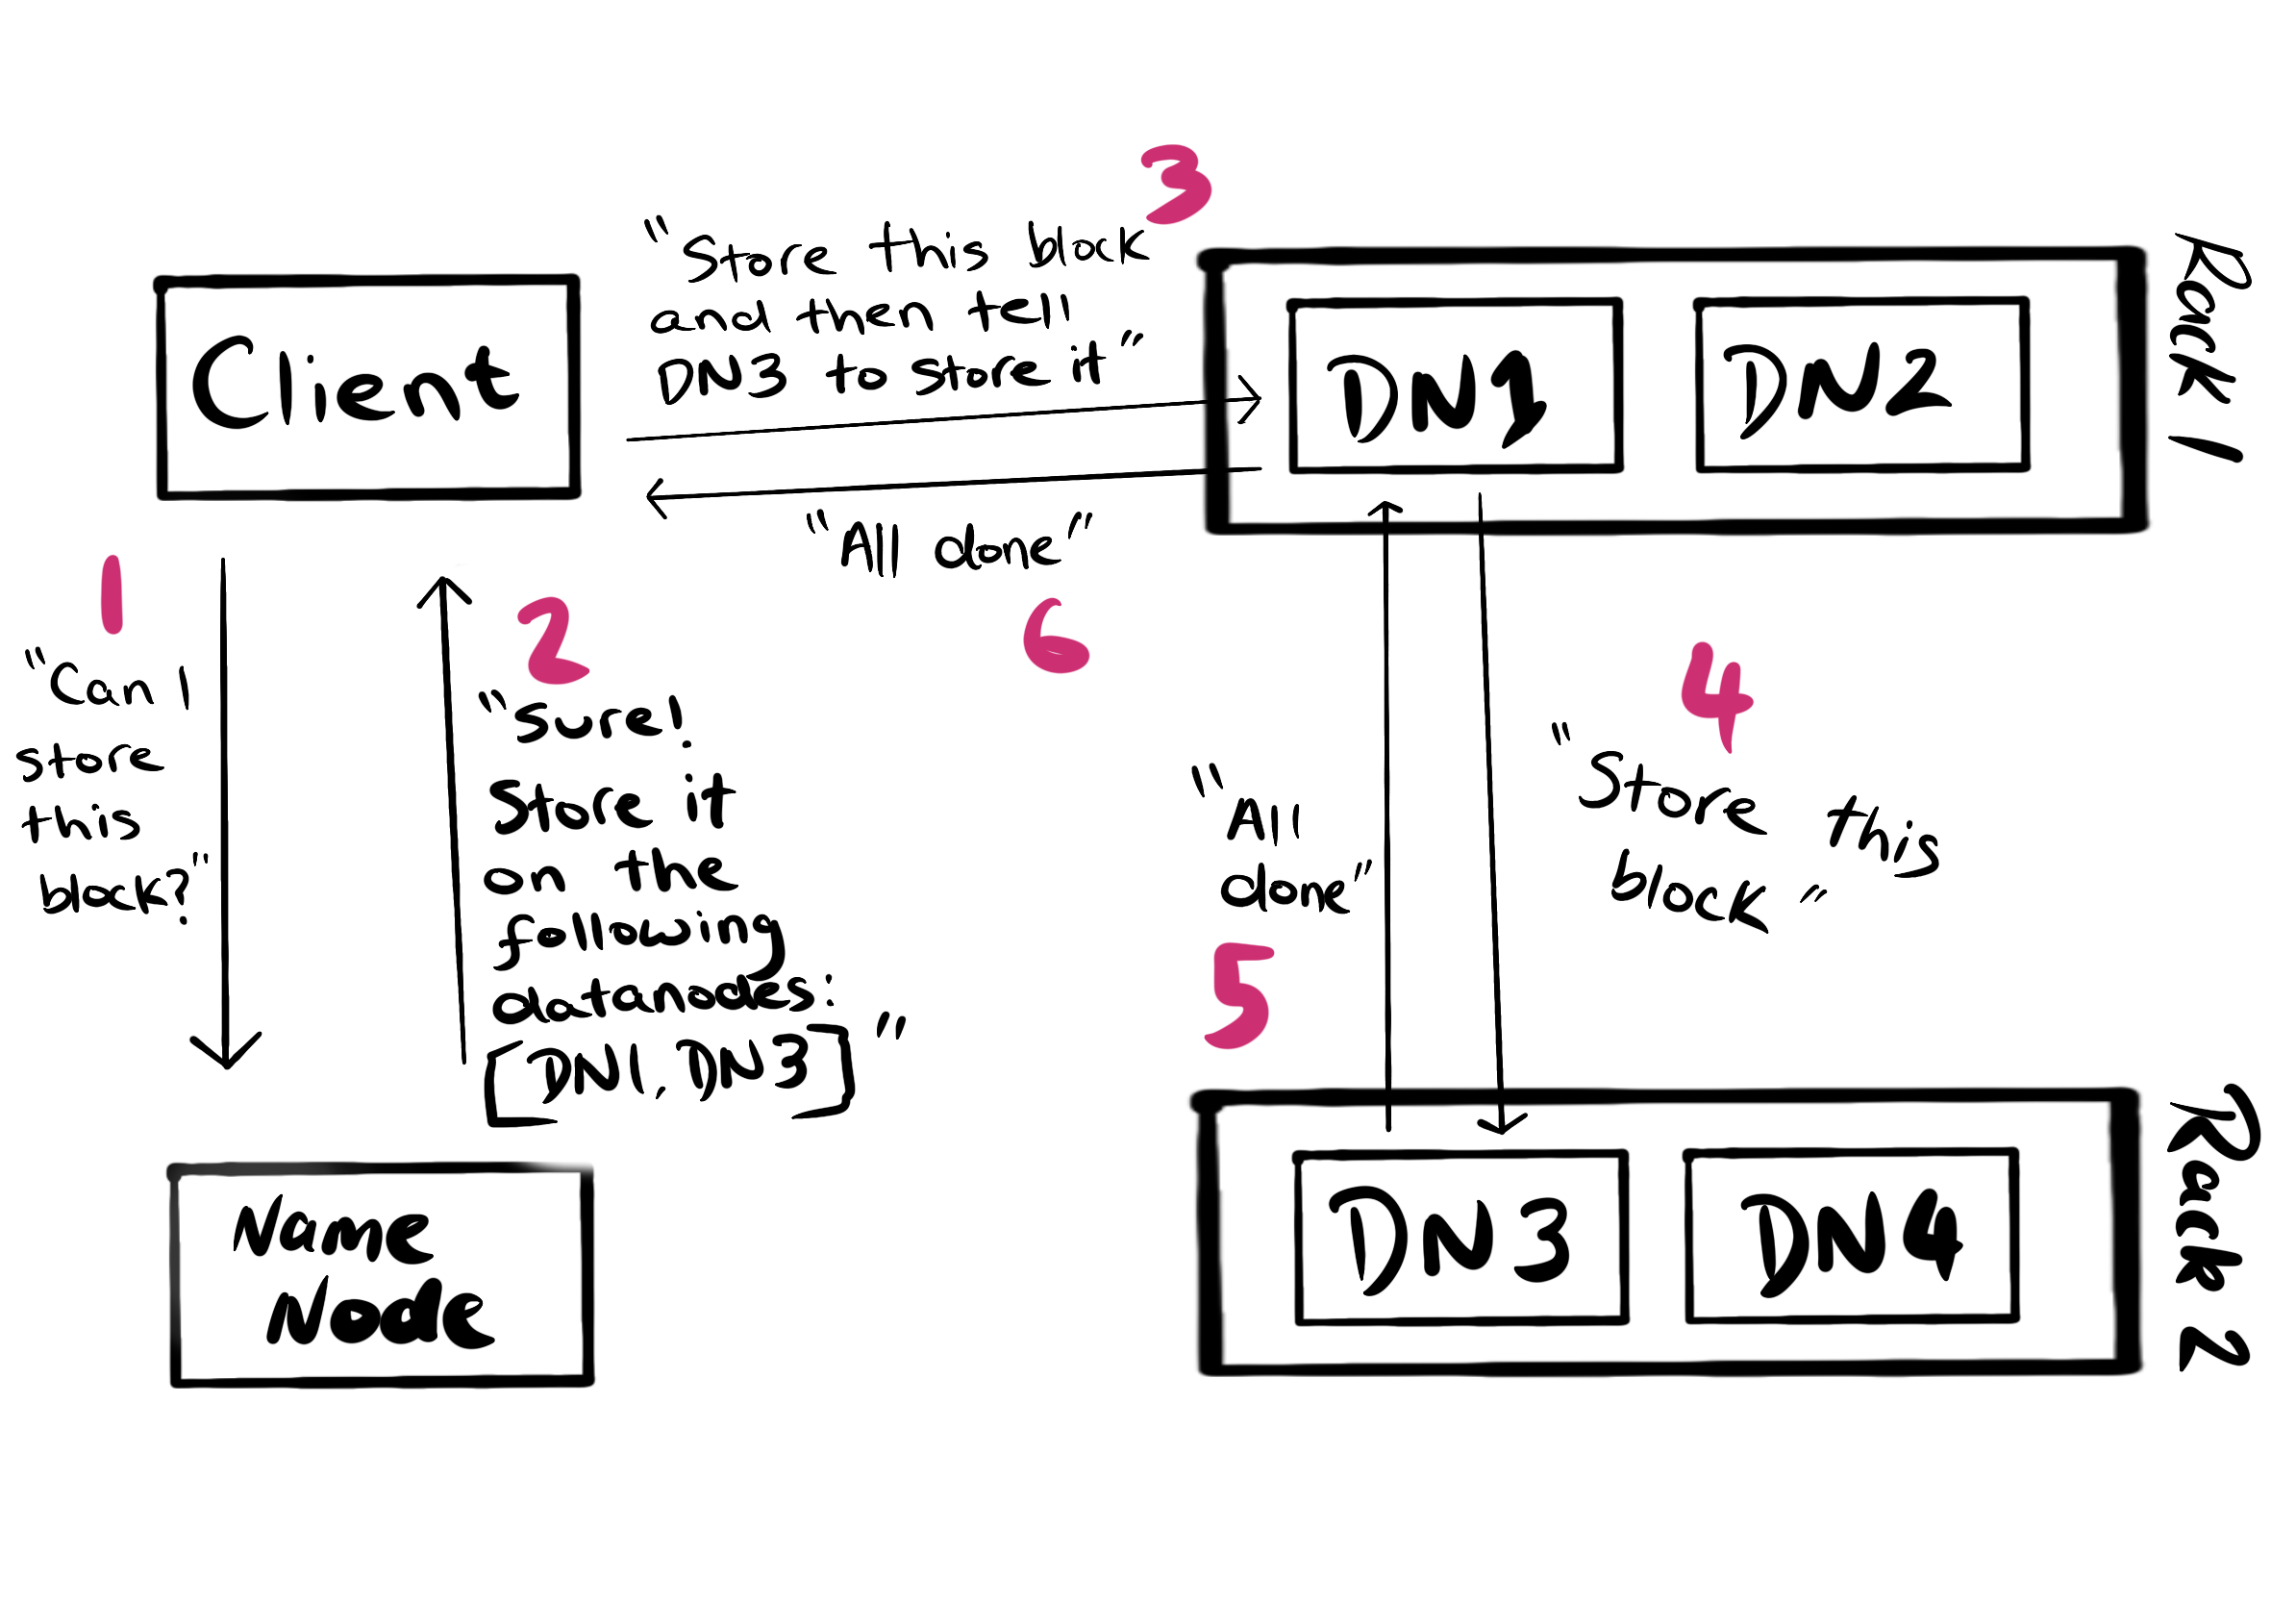
A few extra things to note about this process:
- Before this process begins the client contacts the NameNode to create the file. It will only begin writing blocks once the NameNode verifies that the namespace has been updated. This will not happen if the file already exists or the client doesn’t have permission to write to that location.
- The number of DataNodes returned by the NameNode is equal to the replication factor.
- The backup copy is stored on a different rack. This is deliberate and done to prevent data loss due to a rack failure. It’s referred to as rack awareness.
- DataNodes are in constant communication with the NameNode, so the NameNode will know when the block has been succussfully written.
- The client will not wait until block 1 is written to start writing block 2.
The read process is even simpler:
- Client requests the file’s block locations from the NameNode. If it has permission to view the file these will be given.
- Client reads those blocks from the DataNodes.
Replication facilitates recovery from DataNode failures, making HDFS fault tolerant. But what about NameNode failures? With only one NameNode, any downtime would make the cluster unavailable.
HDFS also has a solution for this, making it highly available (HA).
The basic idea is to have a standby NameNode which is ready to take over from the active NameNode in the event of a failure. For this to work, the active NameNode records all changes made to the file system in an edit log. This edit log is stored on a group of journal nodes.
The Standby NameNode reads all changes to this edit log to keep its fsimage synchronised with the active NameNode. It also receives heartbeats from DataNodes to keep an up to date image of the cluster. In the event of a NameNode crash, the standby NameNode can then continue where the active NameNode left off.
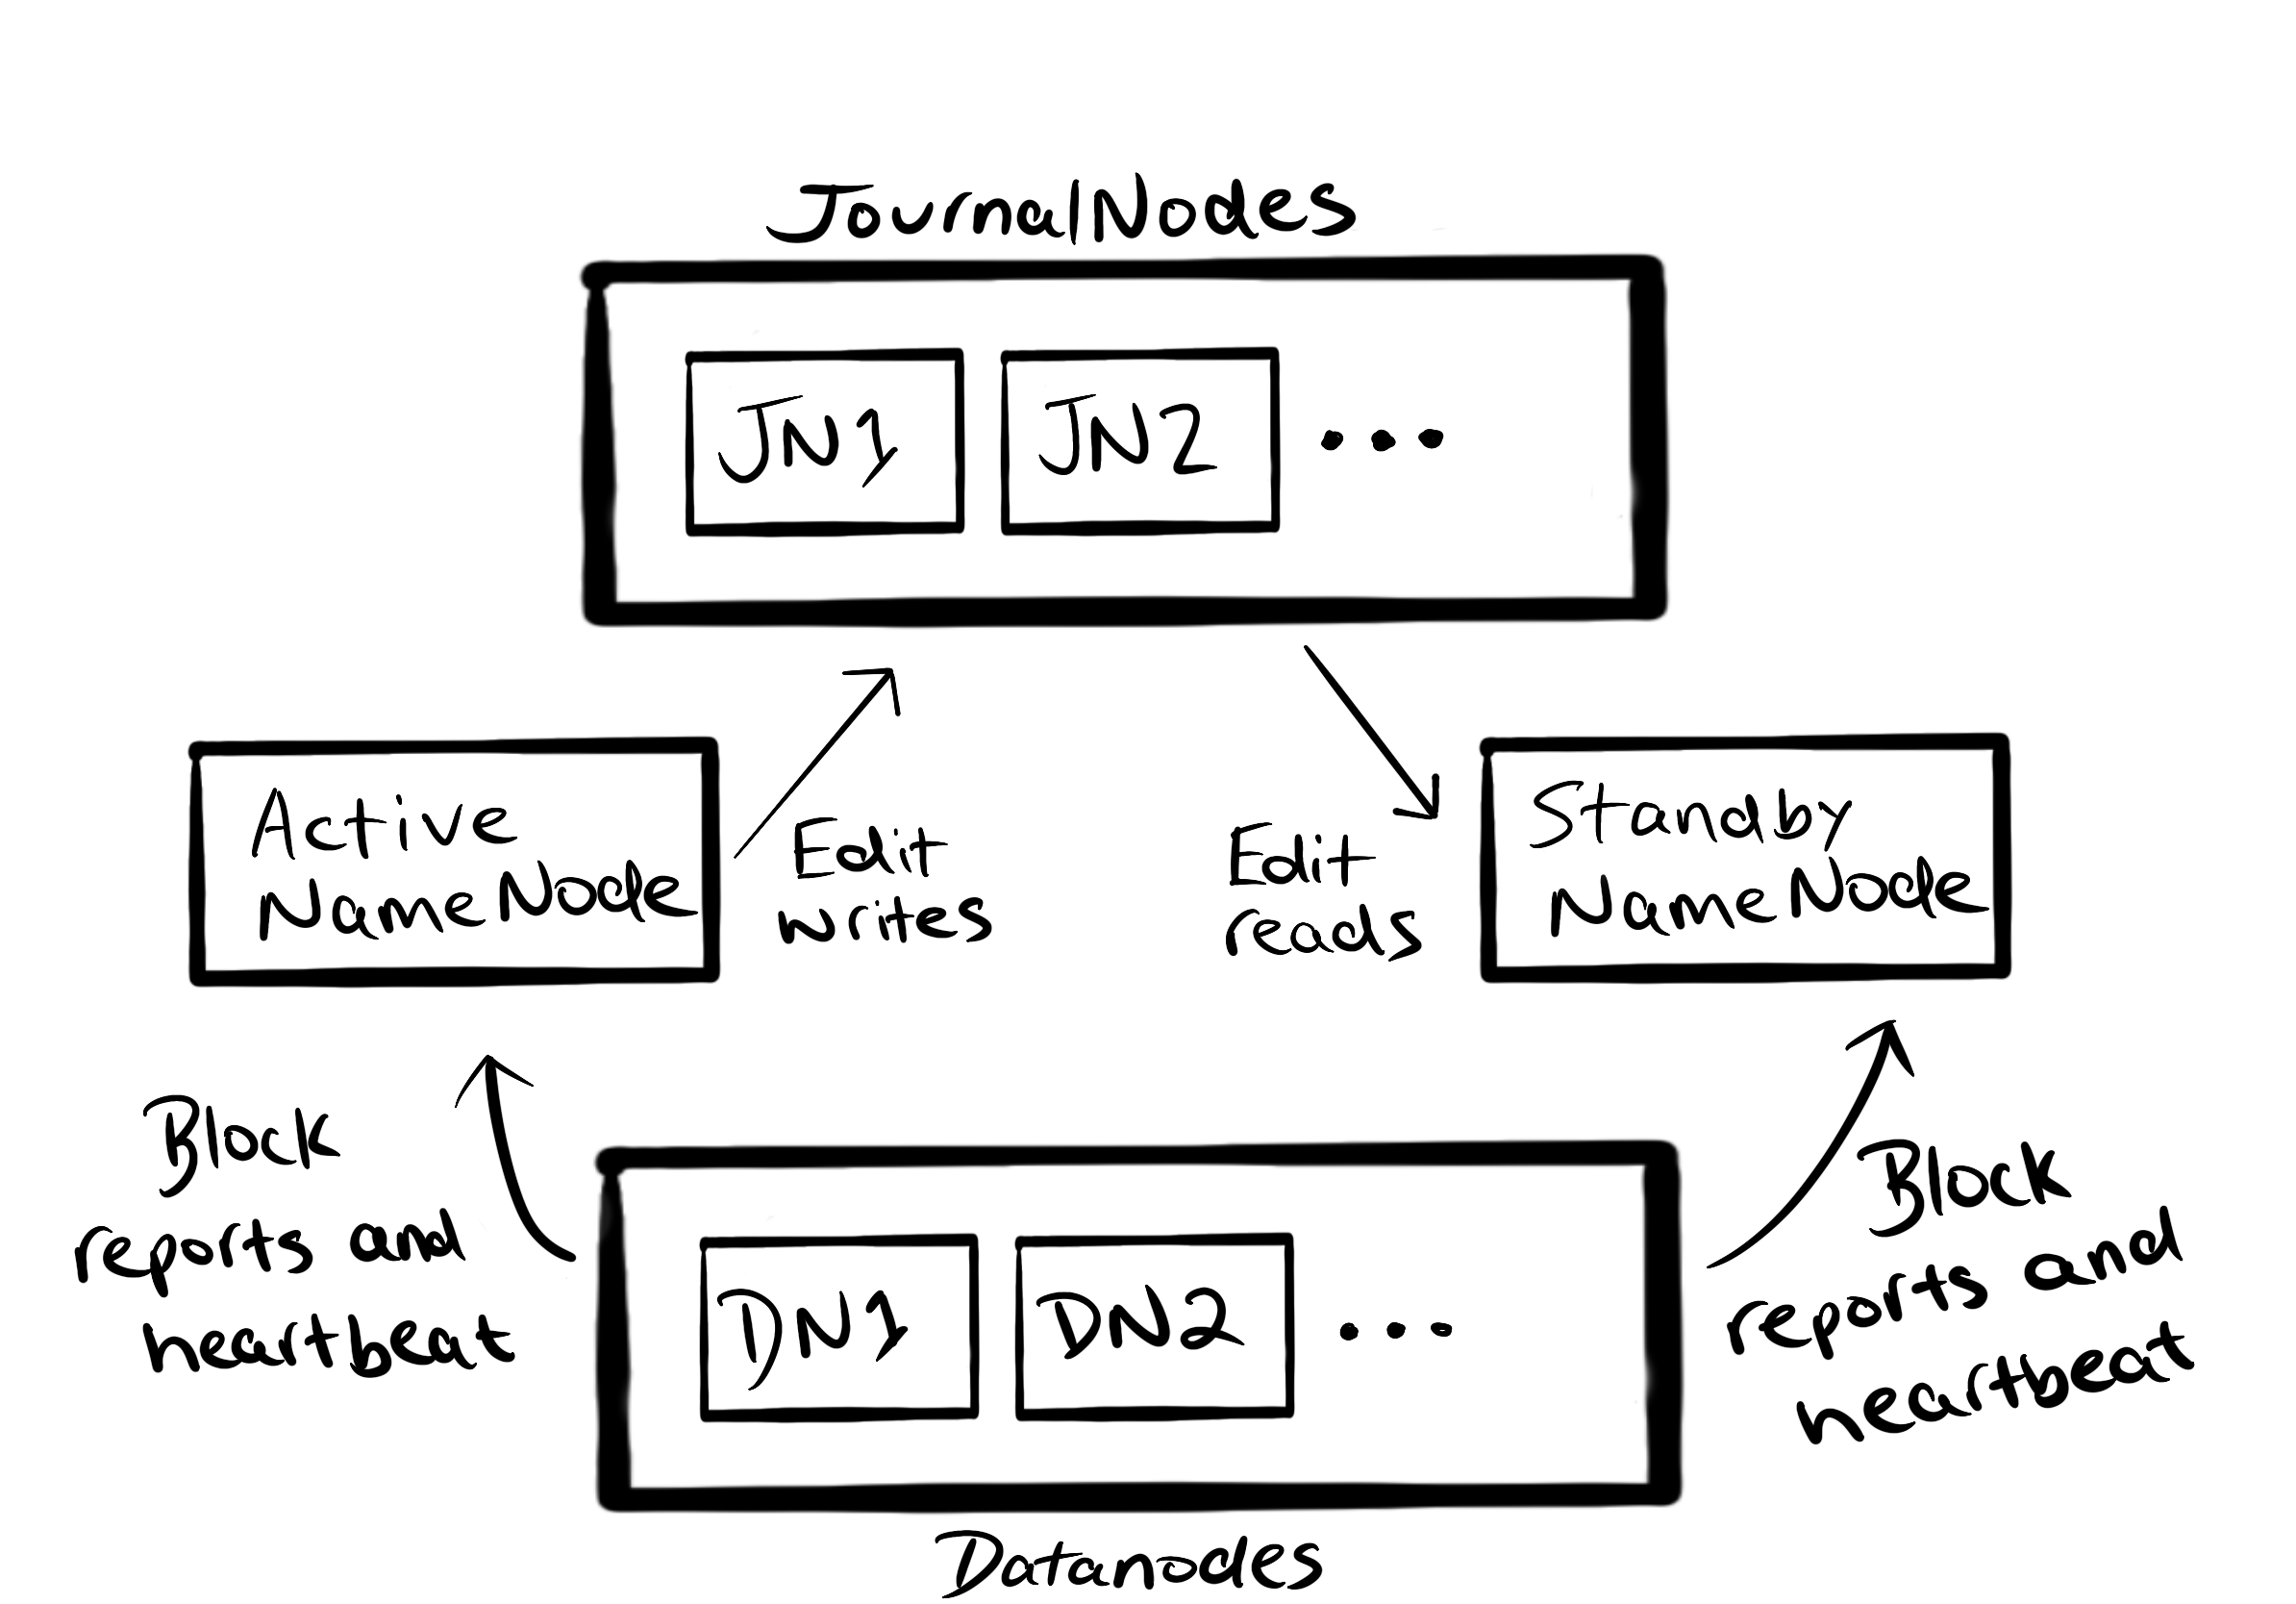
ZooKeeper is used to track when the active NameNode goes down.
Note that this approach to make HDFS highly available isn’t enforced. The cluster needs to be configured to do this.
When not running in highly availability mode, it’s still important to persist the NameNode’s fsimage / edit logs somewhere other than the NameNode. This can be achieved by backing up these file up on a remote file system.
A Secondary NameNode is also run when not in HA mode. The Secondary NameNode reads the NameNode’s edit log periodically and merges it with its local fsimage. That way when the NameNode restarts it can recreate the fsimage by starting with the checkpointed fsimage and then applying a small list of edits, rather than applying all of the edits.
MapReduce
HDFS provides distributed data storage. But what happens if we want to process that data? If only one machine were to do the processing, all relevant data would have to be moved from the DataNodes to that machine. This would be a huge bottleneck.
A better idea is to move the processing to the data. This is the approach taken by MapReduce.
MapReduce is a programming model which processes data in parallel on a cluster.
It consists of two key stages:
- Map: This is the code that each node applies to its local data.
- Reduce: This is the code that combines output from map tasks to produce a final result.
Let’s run through an example. Say we have a file which is stored in two blocks on HDFS. Block 1 contains the text
HDFS is a
distributed file
system
The second block contains the text
I am a file
in HDFS
Obviously this example is not realistic as each of the blocks has less than 50 bytes of data, but it’s easier to illustrate the process with small blocks.
We want to count the number of occurrences of each word in this file. So our goal is to produce
| a | 2 |
| am | 1 |
| distributed | 1 |
| file | 2 |
| HDFS | 2 |
| I | 1 |
| in | 1 |
| is | 1 |
| system | 1 |
To do this we define a map and reduce task with the following pseudocode:
map(line):
    for word in line:
        output (word,1)

reduce(word,counts):
    output (word,counts.sum())
Two map tasks will run in parallel - one for each block. As you can see, the map task doesn’t receive the all the text in the block at once. Rather, the block will be split up into records by the RecordReader, which is determined by the InputFormat. For text files (InputFormat is TextInputFormat), the record reader splits data up into lines. So the map function will be called once per line.
The reduce function will be called once per word ouputted by the map stage. However, before it is called all map outputs with the same word are combined. So rather than being called twice for the input (HDFS,1), it will be called once for the input (HDFS,[1,1]).
The entire process looks something like
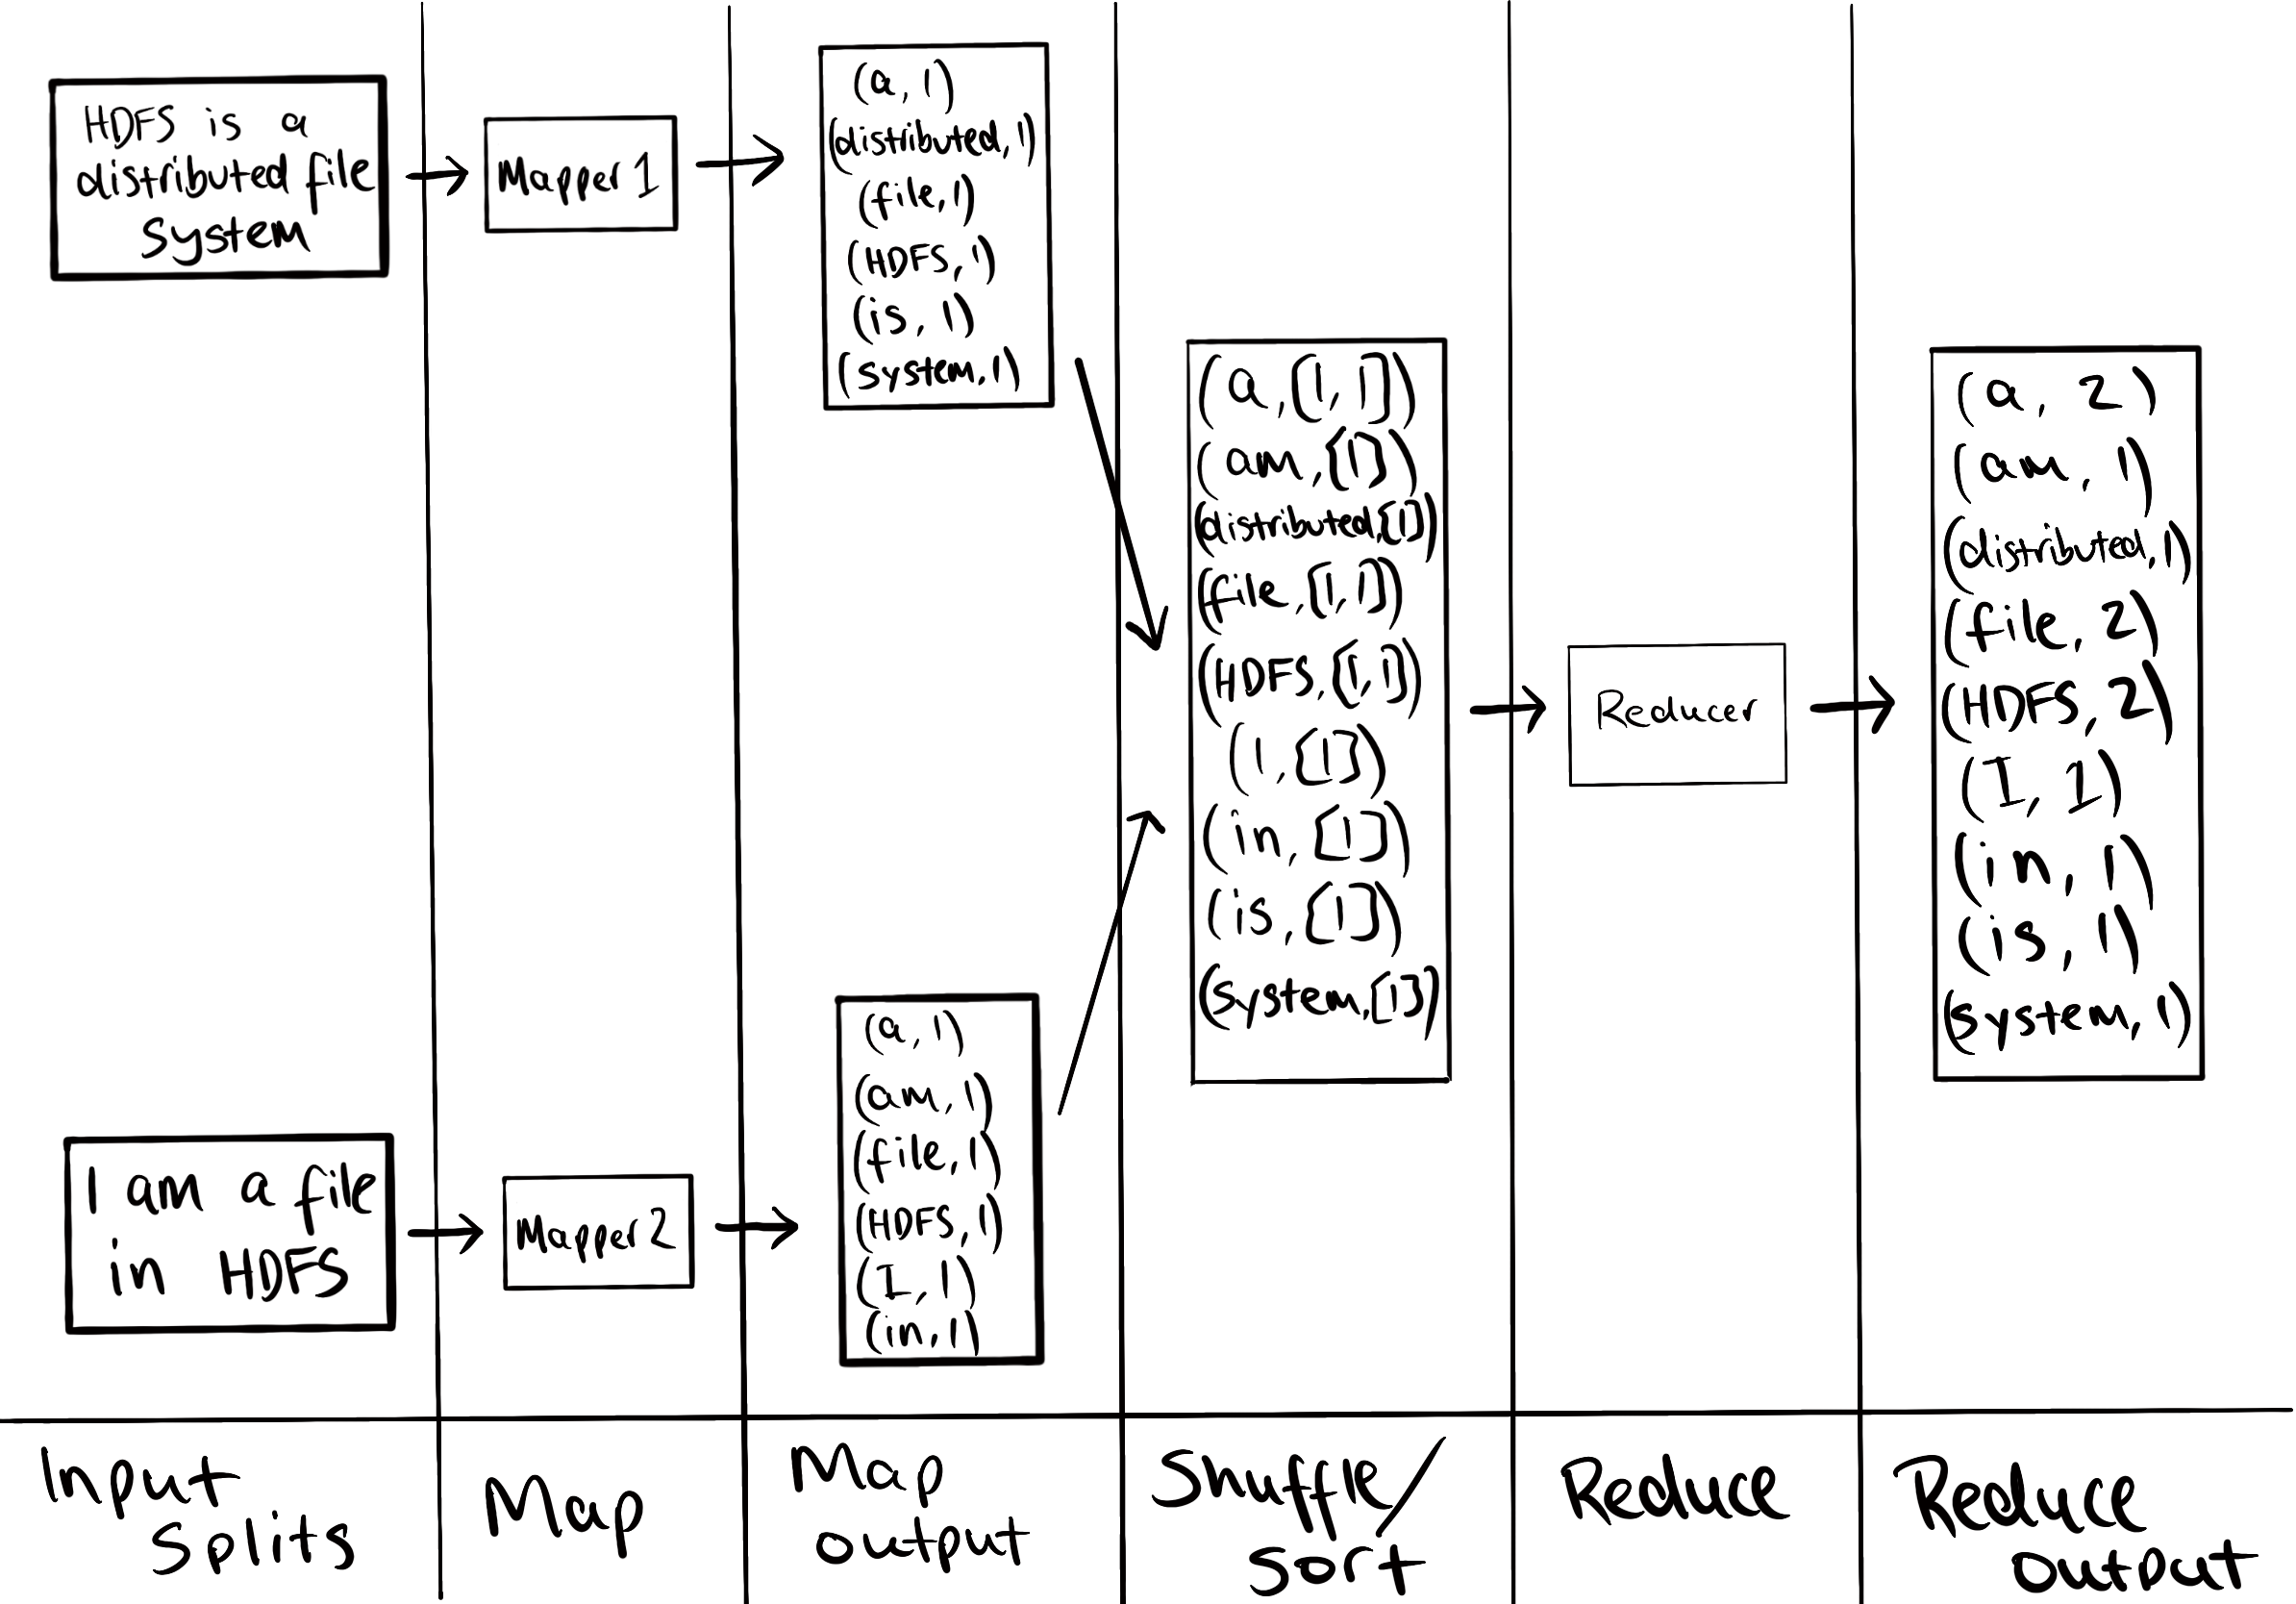
A few things to note:
- Remember, this is running in a distributed environment. The two blocks of data can be stored on different DataNodes and the map tasks can be running on those nodes. That’s the point of MapReduce! It runs in parallel, which is very important when the files are huge.
- Don’t forget the map function is called once per line. Between the InputSplit and Map columns the RecordReader, which is determined by the InputFormat, is splitting the file into lines and calling the map function once for each.
- We use the word input split rather than block. In most cases they are the same thing. Input splits are simply pointers to HDFS locations. Like the RecordReader, they are determined by the InputFormat. The reason they are needed is for the case where one record is split over multiple blocks. See this stack overflow answer for more details.
- There is a stage that runs between map and reduce: shuffle. It simply takes the map outputs and moves them to the reducers. It retains a sorted order by merging the sorted map outputs.
- In this case there is only one reducer however, there can be many. If there are many the map outputs that go to each reducer is determined by a partitioner that can be customised. For example, with two reducers we could have map outputs for words
[a,am,distributed,system]going to reducer1 and the others to reducer2.
Now let’s take a look at the real java code that would be used to run this job:
Some notable differences with the pseudocode:
- The input and output to the map/reduce stages are <key,value> pairs. The types of these pairs are given by the type parameters to the map and reduce function in the form <inputKey,inputValue,outputKey,outputValue>.
The input key to the map is a LongWritable and the value Text. The text is the line the mapper will operate on and the LongWritable is the line’s offset from the beginning of the file. The RecordReader assembles the key value pairs for each input split.
The output key of the map (and input key to reduce) is Text and the value is IntWritable. The text is the word that has been counted and the int is the count. - The Context object is used to emit key value pairs from each stage.
- Not all the job configurations given in the main class are necessary. See the comments in the gist for further explanation.
YARN
In Hadoop 1.x the MapReduce framework included components that were responsible for providing cluster resources to run MapReduce jobs on. If you come across the terms JobTracker and TaskTracker when reading other tutorials, that’s them!
The issue with this coupling is that it prevents other distributed applications from being able to run on a Hadoop cluster. YARN (Yet Another Resource Manager) was made available in Hadoop 2.x to solve this problem. It provides apis for accessing cluster resources that can be used by any distributed execution framework, not just MapReduce 🙂.
YARN consists of two main components:
- ResourceManager: Manages cluster resources - it’s where YARN applications are submitted. There is only one per cluster.
- NodeManager: Launches containers to run applications. There is one per DataNode.
The process of running a YARN application is shown below:
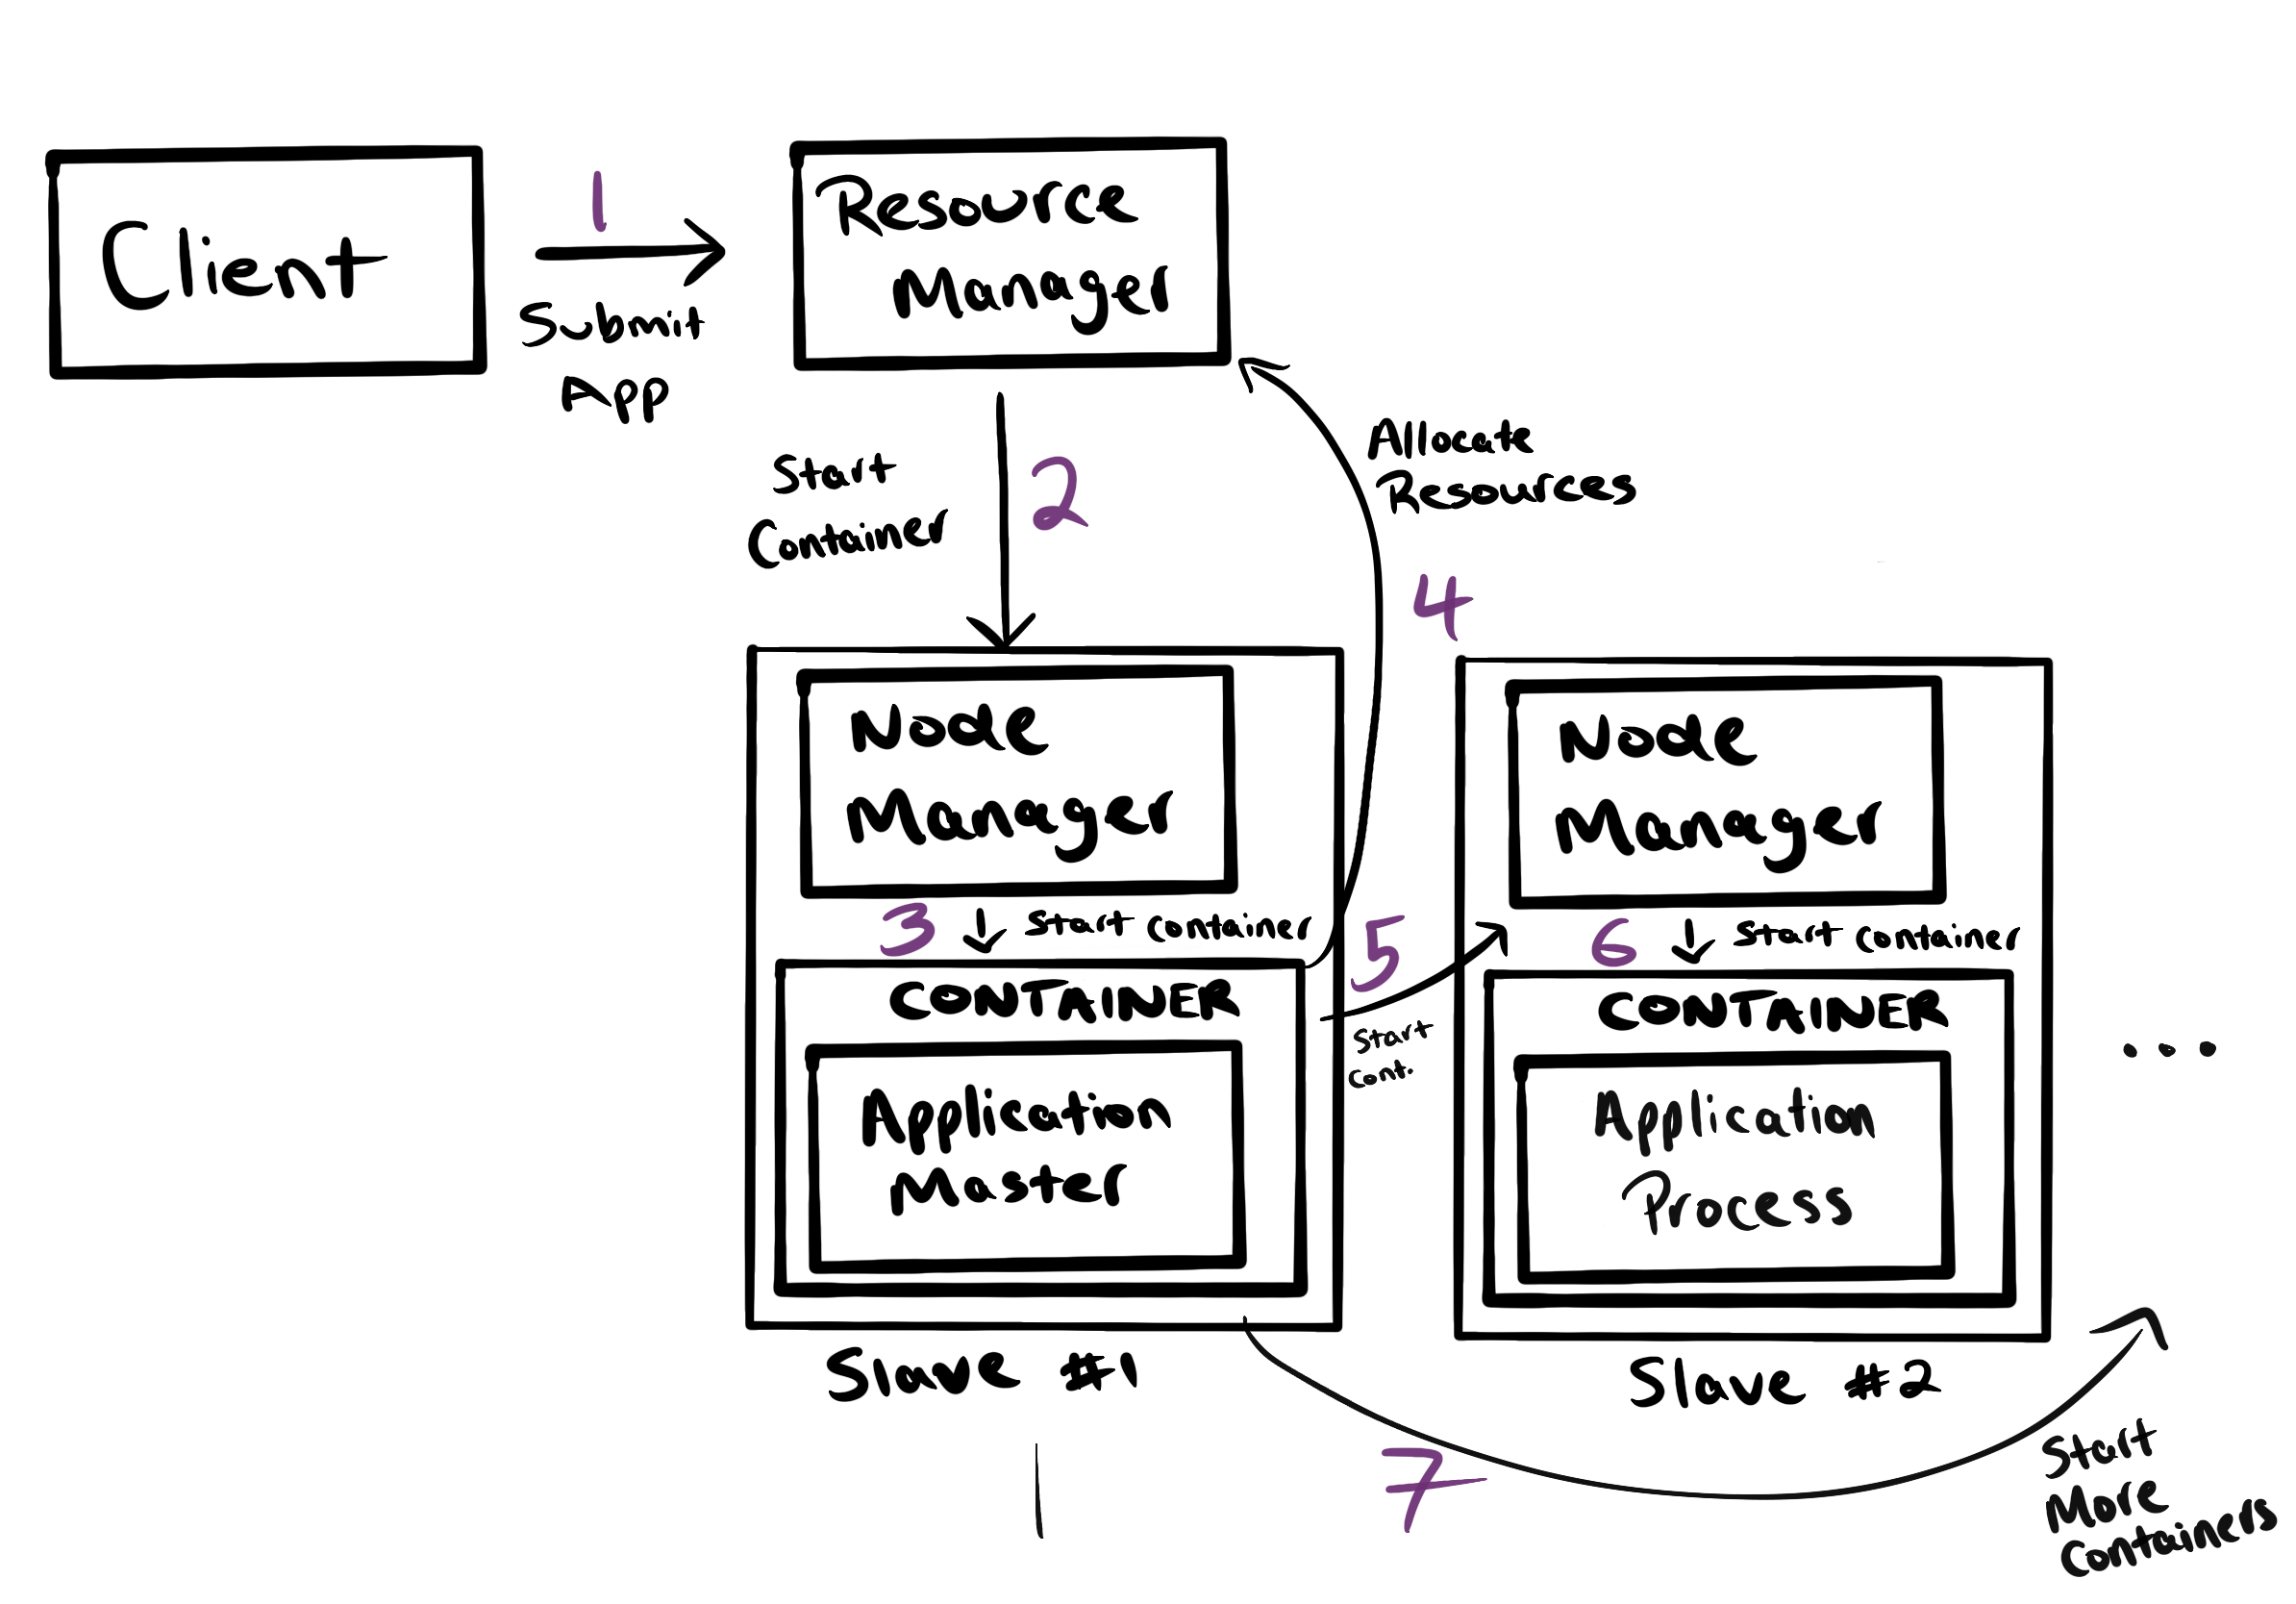
The ApplicationMaster contains all the framework specific stuff. If this were a MapReduce application being run, it would be a MapReduce Application Master. This MRAppMaster would request resources from the Resource Manager to run map and reduce tasks on.
Local Examples
Hadoop runs in three different modes:
- Standalone: Hadoop runs with the local file system, not HDFS. It’s the default installation mode. This is fine for testing purposes, but isn’t going to be too useful for learning about HDFS.
- Pseudo-distributed: All Hadoop daemons (DataNode, NameNode, ResourceManager and NodeManager) run on the same machine. This is a good way to get an idea of how Hadoop works without having to run your own cluster.
- Cluster: This is how Hadoop runs in the real world.
The first two modes will be covered in this section.
Installation
Before you can run Hadoop you need to install it. I installed it on the Raspberry Pi with the following steps:
- Download the Hadoop binary tarball. You can do this with the command
curl -O http://binary_tarball_url. The url can be found from the Hadoop Releases Page - Verify the checksum. See the releases page for instructions on how to do this.
- Put it in the right location with the correct permissions.
tar xvzf hadoop-x.y.z.tar.gz
mv hadoop.x.y.z /opt/hadoop
sudo chown <current-user>:<current-group> /opt/hadoop -R
I’ll use
pi:pias the user/group as that’s the default on the Raspberry Pi.
Note it’s best practice to create dedicated users for hadoop daemons and place them all in a Hadoop group. In that case we’d be changing ownership to a specific hadoop group/user. I’ve skipped that step to minimise the admin necessary to get the cluster up and running. - Add the Hadoop binaries to the path and set important environment variables. You’ll probably want to put these in your bash profile.
export HADOOP_HOME=/opt/hadoop
export JAVA_HOME=path_to_jdk
export PATH=$PATH:$HADOOP_HOME/bin:$HADOOP_HOME/sbin
For me
JAVA_HOME=/usr/lib/jvm/java-8-openjdk-armhf. - If you don’t already have ssh keys generate them using
ssh-keygen -t rsa - Daemons use ssh to communicate and it needs to be passwordless. As all deamons will be on the same machine in pseudo-distributed mode they’ll ssh to localhost, meaning the machine’s own public ssh key needs to be in the authorized keys file.
cat ~/.ssh/id_rsa.pub >> ~/.ssh/authorized_keysRun
ssh localhostto check you aren’t prompted for a password.
Standalone Mode
Hadoop comes with mapreduce examples that can be used to verify everything is working properly. Run the wordcount example using the following steps.
mkdir -p ~/hadoop-test/input
echo "one\ntwo\none" > ~/hadoop-test/input/input.txt
hadoop jar $HADOOP_HOME/share/hadoop/mapreduce/hadoop-mapreduce-examples-x.y.z.jar wordcount ~/hadoop-test/input ~/hadoop-test/output
cat ~/hadoop-test/output/part-r-00000
The last command should print
one	2
two	1
Pseudo-distributed Mode
Configuration
To set up pseudo-distributed mode the configuration files need to be edited. They are located at $HADOOP_HOME/etc/hadoop. Here’s a basic description of those that need editing:
- hadoop-env.sh: Environment variables used by Hadoop.
- core-site.xml: Configurations which are used by all Hadoop components.
- hdfs-site.xml: Configurations used by HDFS.
- mapred-site.xml: Configurations used by MapReduce.
- yarn-site.xml: Configurations used by YARN.
The configurations necessary to run in pseudo-distributed mode are:
- hadoop-env.sh: Set the
JAVA_HOMEvariable in this file. - core-site.xml:
<configuration> <property> <name>fs.defaultFS</name> <value>hdfs://localhost:9000</value> </property> </configuration> - hdfs-site.xml:
<configuration> <property> <name>dfs.replication</name> <value>1</value> </property> <property> <name>dfs.namenode.name.dir</name> <value>file:///opt/hadoop/hadoop_data/hdfs/namenode</value> </property> <property> <name>dfs.datanode.name.dir</name> <value>file:///opt/hadoop/hadoop_data/hdfs/datanode</value> </property> </configuration> - mapred-site.xml:
<configuration> <property> <name>mapreduce.framework.name</name> <value>yarn</value> </property> <property> <name>mapreduce.application.classpath</name> <value>$HADOOP_MAPRED_HOME/share/hadoop/mapreduce/*:$HADOOP_MAPRED_HOME/share/hadoop/mapreduce/lib/*</value> </property> </configuration> - yarn-site.xml:
<configuration>
    <property>
        <name>yarn.nodemanager.aux-services</name>
        <value>mapreduce_shuffle</value>
    </property>
    <property>
        <name>yarn.nodemanager.env-whitelist</name>
        <value>JAVA_HOME,HADOOP_COMMON_HOME,HADOOP_HDFS_HOME,HADOOP_CONF_DIR,CLASSPATH_PREPEND_DISTCACHE,HADOOP_YARN_HOME,HADOOP_MAPRED_HOME</value>
    </property>
</configuration>
dfs.namenode.name.dir and dfs.datanode.name.dir are the locations of the NameNode’s fsimage and the DataNode’s data blocks on the local file system. Before we run Hadoop, we need to create those directories first.
sudo mkdir -p /opt/hadoop_tmp/hdfs/namenode
sudo mkdir -p /opt/hadoop_tmp/hdfs/datanode
sudo chown <current-user>:<current-group> -R /opt/hadoop_tmp
Run hdfs namenode -format. This creates a fresh fsimage at dfs.namenode.name.dir. The Hadoop cluster is now ready to be started.
There are a number of scripts in $HADOOP_HOME/sbin that can be used to start Hadoop daemons. If you’ve followed all the instructions the scripts in this directory are already on the path. Run start-all.sh to start the entire cluster. stop-all.sh will stop it.
Verify the deamons are up by running jps. You should see the NodeManager, ResourceManager, Namenode, SecondaryNameNode and DataNode. If the NameNode isn’t listed, you probably didn’t run hdfs namenode -format
You may notice a couple of warnings when you start the daemons.
- …might have disabled stack guard. The VM will try try to fix the stack guard now.
- Unable to load native-hadoop library for your platform… using builtin-java classes where applicable
Hadoop uses native code (machine code) rather than bytecode to increase the performance of some components. So if the native code downloaded wasn’t compiled on your system (maybe it was compiled on a 32 bit system and you’re on a 64 bit system) there’ll be some warnings. Three ways of dealing with them:
- Ignore them.
- Silence them. Add
export HADOOP_OPTS="-XX:-PrintWarnings"to hadoop-env.sh andexport HADOOP_HOME_WARN_SUPPRESS=1 export HADOOP_ROOT_LOGGER="WARN,DRFA"to the bash profile.
- Download the Hadoop source code and compile the native libraries yourself. The process looks quite involved, so I just silenced them 🙂
HDFS Commands
The file system commands are very similar to Linux. The general structure of a command is
hadoop fs -<command> <args>
For example
hadoop fs -ls .
hadoop fs -rm -r temp-dir
hadoop fs -cat ouptut/test.txt
MapReduce Example
To run the same MapReduce job as in standalone the input file needs to be on hdfs. To do that first create a directory for your user.
hadoop fs -mkdir -p /user/<username>
The username can be found by running whomai.
This directory is your home directory, so you don’t need to prefix all paths with /user/<username>
Now put the input file on hdfs and check the operation was successful:
hadoop fs -mkdir input
echo "one\ntwo\none" > ~/hadoop-test/input/input.txt
hadoop fs -copyFromLocal ~/hadoop-test/input/input.txt input/input.txt
hadoop fs -ls input
If so, run the job:
hadoop jar $HADOOP_HOME/share/hadoop/mapreduce/hadoop-mapreduce-examples-x.y.z.jar wordcount input output
hadoop fs -cat output/part-r-00000
The same output as in standalone mode should have been printed.
Custom MapReduce Example
Custom MapReduce jobs can be run too. To demonstrate this let’s compile and run a wordcount program from scratch.
mkdir -p ~/hadoop-test/custom && cd ~/hadoop-test/custom
curl -O https://gist.githubusercontent.com/jdoldissen/ad6b12ced708e6ce698cf4a6b0d5128c/raw/ff61660212698a8c81260a960108854bdee95e6e/WordCount.java
javac -classpath $(hadoop classpath) WordCount.java
jar cvf WordCount.jar *.class
hadoop fs -rm -r output # Hadoop complains if the output directory is already there
hadoop jar WordCount.jar WordCount input output # Assuming you created the input file in the previous example
hadoop fs -cat output/part-r-00000
Once again the same output should be produced.
Web Interface
The master deamons come with web interfaces. These can be useful for checking the logs of a job, health of the cluster, file system state and a lot more.
The addresses of the interfaces are:
- ResourceManager: localhost:8088
- NameNode: localhost:9870
There’s a number of useful services the web interfaces provide. For the NameNode’s:
- The overview tab gives a nice summary of high level cluster info e.g. how many DataNodes are running, whether the cluster is in safemode, % of memory used etc.
- The utilities dropdown provides some interesting services. One is the ability to browse the file system. When you open a file in this view you can see where the block is located on the cluster.
- There is also a configuration utility which allows you to see the configuration the cluster is using. This is the entire config - those you specified + the defaults.
For the Resource Manager’s:
- The homepage gives you a good overview of the cluster’s activity and health. If you’re having issues running jobs on the cluster, use the UI to make sure the nodes that you think are up are accessible.
- You can view the applications that are / have been running on the cluster.
Cluster Examples
A cluster of Raspberry Pis are used to run Hadoop on in this section. See this page for more info on the pis.
Networking
Static IP Addresses
Nodes in the cluster connect via ssh. As we’ll be relying on IP addresses to do this it’s best to set static IP addresses for each node.
To set a static IP address on the Raspberry Pi see this stack exchange answer.
Once set log onto your router and reserve the addresses. This prevents the DHCP server which runs on the router from giving the addresses out to other machines.
Unique Hostnames
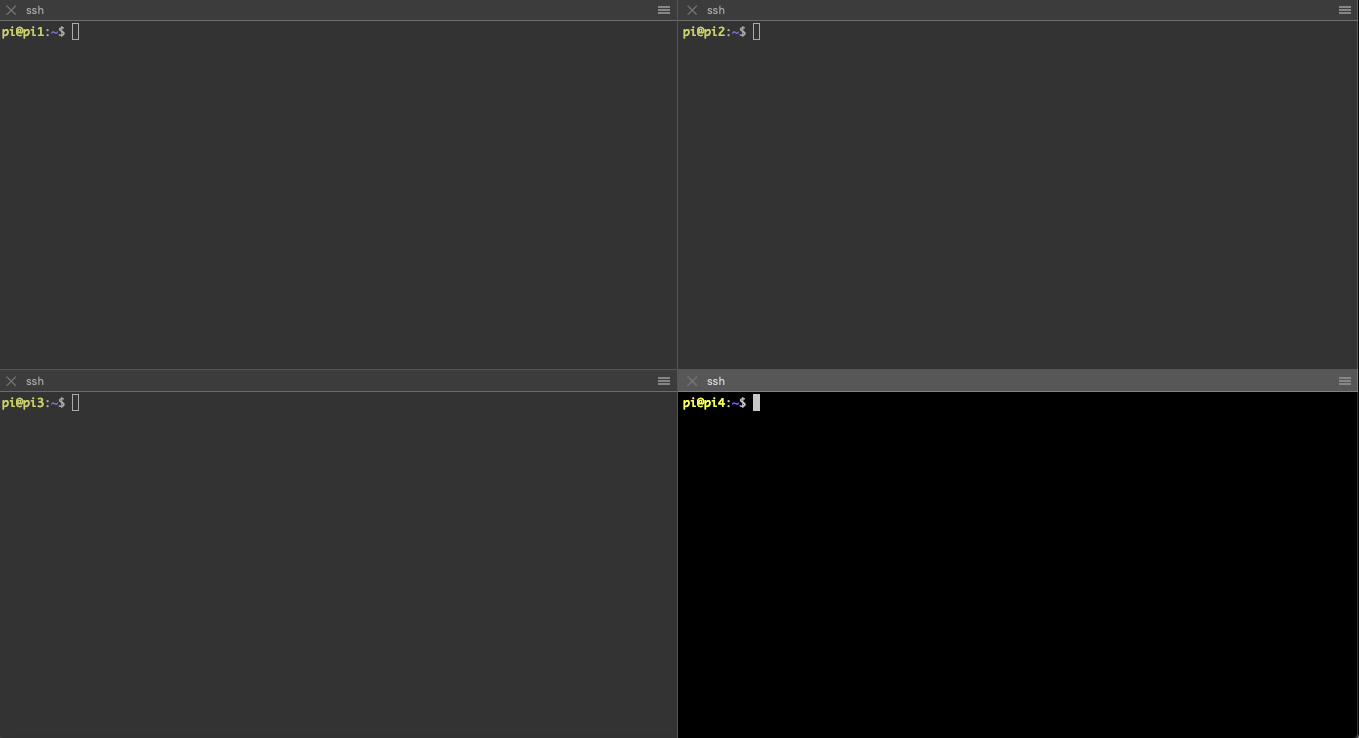
It’ll be less confusing if each node has a unique hostname rather than the default rasbperry pi. This is because you will likely have terminal panes for each pi and you want to be able to tell the difference, as shown in the below image:
To update the hostname open /etc/hostname and change raspberrypi to the desired name. Something like node1 or pi1 would do fine. Then open /etc/hosts and again change raspberrypi to the new name. Do this for each node.
The /etc/hosts file is used for local domain translation (like a local DNS server). It will be useful to be able to translate the hostnames of other nodes to IP addresses. To do this add an entry in the file for each node:
x.x.x.x pi1
x.x.x.y pi2
...
...
You also need to remove lines that map the hostname of the machine to localhost (the lines you just edited in the step above). For example on pi1 remove the line
127.0.0.1 pi1
Your cluster won’t work if you don’t do this as some daemons (e.g. the NameNode) will listen on the loopback interface rather than an externally accessible interface.
As the loopback entries have been removed /etc/hosts should be the same on each machine. As long as you haven’t added custom entries on the other nodes you can simply copy it using scp.
SSH
Two things are going to make ssh play nicely:
- Aliases: To avoid having to type the IP addresses of the nodes when sshing to them aliases can be used. To alias
pi@192.168.1.107as pi1 add the following to
~/.ssh/config:HOST pi1 HostName 192.168.1.107 User piNow ssh is as easy as
ssh pi1The config should contain aliases for all nodes on the network and should be identical on every node. So again just create the config once and use
scp. - No passwords: To make sshing between nodes passwordless, each node’s authorized_keys file needs to contain the public keys of all other nodes. To copy a public key from one machine to another the following command can be used:
cat ~/.ssh/id_rsa.pub | ssh pi1 'cat >> ~/.ssh/authorized_keys'where pi1 is the alias of the machine the key is being copied to. Once this command has been run from each machine in the cluster, the authorized_keys file on pi1 can be copied to other machines using
scp. Don’t forget to copy pi1’s public key into its own authorized_keys file.
Installation
- Change the configurations to run Hadoop in cluster mode. Note that the memory properties in
yarn-site.xmlandmapred-site.xmlwill depend on the machine’s RAM. I have 4GB of RAM on each machine. See this page for a good explanation of how to set these properties.- hadoop-env.sh: Set the
JAVA_HOMEvariable in this file. - core-site.xml:
<configuration>
    <name>fs.defaultFS</name>
    <value>hdfs://pi1:9000</value>
</configuration>
Note pi1 should be the alias of the master node in
/etc/hosts. - hdfs-site.xml:
<configuration> <property> <name>dfs.replication</name> <value>1</value> </property> <property> <name>dfs.namenode.name.dir</name> <value>file:///opt/hadoop_tmp/hdfs/namenode</value> </property> <property> <name>dfs.datanode.name.dir</name> <value>file:///opt/hadoop_tmp/hdfs/datanode</value> </property> <property> <name>dfs.namenode.checkpoint.dir</name> <value>file:///opt/hadoop_tmp/hdfs/namenodesecond</value> </property> </configuration> - mapred-site.xml:
<configuration> <property> <name>mapreduce.framework.name</name> <value>yarn</value> </property> <property> <name>mapreduce.application.classpath</name> <value>$HADOOP_MAPRED_HOME/share/hadoop/mapreduce/*:$HADOOP_MAPRED_HOME/share/hadoop/mapreduce/lib/*</value> </property> <property> <name>yarn.app.mapreduce.am.resource.mb</name> <value>512</value> </property> <property> <name>mapreduce.map.memory.mb</name> <value>256</value> </property> <property> <name>mapreduce.reduce.memory.mb</name> <value>256</value> </property> </configuration> - yarn-site.xml:
 <configuration>
     <property>
         <name>yarn.resourcemanager.hostname</name>
         <value>pi1</value>
     </property>
     <property>
         <name>yarn.nodemanager.aux-services</name>
         <value>mapreduce_shuffle</value>
     </property>
     <property>
         <name>yarn.nodemanager.env-whitelist</name>
         <value>JAVA_HOME,HADOOP_COMMON_HOME,HADOOP_HDFS_HOME,HADOOP_CONF_DIR,CLASSPATH_PREPEND_DISTCACHE,HADOOP_YARN_HOME,HADOOP_MAPRED_HOME</value>
     </property>
     <property>
         <name>yarn.nodemanager.resource.memory-mb</name>
         <value>1536</value>
     </property>
     <property>
         <name>yarn.scheduler.maximum-allocation-mb</name>
         <value>1536</value>
     </property>
     <property>
         <name>yarn.scheduler.minimum-allocation-mb</name>
         <value>128</value>
     </property>
     <property>
         <name>yarn.nodemanager.vmem-check-enabled</name>
         <value>false</value>
     </property>
 </configuration>
- hadoop-env.sh: Set the
- Install the Hadoop binaries on each node. There are a few ways to do this:
- Reinstall using previous instructions
- Copy the tar file downloaded originally. For example to copy the file to pi2:
scp hadoop-x.y.z.tar.gz pi2:/home/pi ssh pi2 sudo mv hadoop-x.y.z.tar.gz /opt && cd /opt sudo tar xvzf hadoop-x.y.z.tar.gz sudo mv hadoop.x.y.z hadoop sudo chown pi:pi /opt/hadoop -R - Tar the hadoop directory you’ve been working in and copy that. This has the added advantage of skipping the next step as the config files will be packaged with the tar. To do this use roughly the same instructions as in the previous point (the tar name is different and you won’t have to execute
sudo mv hadoop.x.y.z hadoop) but first tar the directory:tar czvf my-hadoop.tar.gz /opt/hadoop
- Copy the configuration files to each node. For example to copy the files from pi1 to 2, 3 and 4:
for node in pi2 pi3 pi4; do scp ~/hadoop/etc/hadoop/* $node:/opt/hadoop/etc/hadoop/; done - Create required file system directories on each node:
sudo mkdir /opt/hadoop_tmp/hdfs
sudo chown -R pi:pi /opt/hadoop/hadoop_tmp
Note this is the local directory where hdfs data will actually be held.
Run the Cluster
On the cluster one node will be the master and all others workers. The master node runs the NameNode, Secondary NameNode and ResourceManager daemons. Each worker runs the DataNode and NodeManager daemons.
On the master node, add the file $HADOOP_HOME/etc/hadoop/workers and list the workers. For example if you have 4 nodes and 2-4 are the workers the file resides on pi1 with contents:
pi2
pi3
pi4
Format the namenode and start up the cluster:
hdfs namenode -format
start-all.sh
start-all.sh will start daemons across the cluster. Check it worked by running jps on each node and ensuring the daemons discussed above are running.
Test the Cluster
One error you may see when running jobs with the above configuration is Error: Java heap space
The fix to this is to add the following to mapred-site.xml:
<property>
    <name>mapred.child.java.opts</name>
    <value>-Xmx2048m</value>
</property>
Xmx is a java option that sets the max Java heap size. It’s an absolute value, so it will depend on available RAM. Above I’m giving 2GB of heap space.
WordCount
See the pseudo-distributed mode word count instructions.
A bigger example
Let’s get some more data onto this cluster!
Hadoop comes with some useful tools for benchmarking how your cluster is performing. You can generate large amounds of data with the teragen program. For example, to store 4GB of random data in the directory random-data on hdfs run
hadoop jar $HADOOP_HOME/share/hadoop/mapreduce/hadoop-mapreduce-examples-x.y.z.jar teragen 40000000 random-data
The first parameter is the number of rows to write. Each row contains 100B of data.
Now let’s sort the 4GB of data:
hadoop jar $HADOOP_HOME/share/hadoop/mapreduce/hadoop-mapreduce-examples-x.y.z.jar terasort random-data sorted-data
While this is running you can logon to the web UI and track the progress, see what nodes tasks are running on etc.
There’s also a builin program to check the sort was successful. Any errors will be shown in the report/part-r-00000 file:
hadoop jar $HADOOP_HOME/share/hadoop/mapreduce/hadoop-mapreduce-examples-x.y.z.jar teravalidate sorted-data report
Other Interesting Things
- You can see the fsimage checkpoints and edit logs on the NameNode / Secondary NameNode by running
tree /opt/hadoop_tmp. You’ll see that there are a number of edit log files but only one with “inprogress” in its name. These are all the edits since the last checkpoint took place.
Debugging / Admin / Generally Useful Commands
- To access application logs from the web UI you need to setup log aggregation. See this stackoverflow answer for more details. Without this, you’ll have to ssh into the node the application ran on and find the logs which is a bit of a hassle.
- Type
yarn --help,hdfs --helpandhadoop --helpand explore a little. Some commands I’ve found useful:yarn -application -list # List running apps. If you want to see finished, use "-appStates ALL"hdfs datanode # Start the datanode. This is useful when the datanode won't start when executing the helper scripts as you can conveniently see the startup loghdfs namenode # Start the namenode.hdfs dfsadmin -safemode get # Check if the cluster is in safemodehdfs fsck / # Check the health of the file systemhdfs fsck /user/pi/input/input.txt -files -blocks # Show the blocks that input.txt is stored inhdfs dfsadmin -report # Display the current status of the file systemyarn logs -applicationId <applicationId> # Show the yarn logs for the given application id (only works if log aggregation is enabled - see above point for details).export HADOOP_CONF_DIR=xxx # Great for switching between configurations (e.g. you want to have a pseudo-distributed conf and a cluster conf on one machine)hdfs dfs -setrep -w <REPLICATION_FACTOR> <PATH> # Change the replication factor of an existing file